
This blog details how I accelerated the deployment of cloud environments through the creation of a web portal called ODIN ‘Optimal Deployment In Network’. This will be a continuation series with this article being Part I.
Discussing The Problem
With CI/CD most of the time being implemented by grabbing code, running tests, and deploying the code in question to a specific environment; I wanted to produce an application that could be used to create infrastructure with a simple button click. I began brainstorming on different ways of creating my application, but I needed a precise problem to solve.
It quickly became clear that a major pain point to be addressed was a bottleneck in the deployment process of environments for the use of the development team that took days and even weeks. Mitigating this pain point seemed like a good place to start because it could optimize an important part of the current flow and also pave the way to the implementation of CI/CD in the future.
ODIN would automate the process and make dev/test environments available to developers on demand via an easy “one-click” process that will take minutes instead of days, therefore assisting in order to optimize and streamline deployments. This process can also be extended in the future to be triggered automatically as part of a CI/CD process.
Overview
I designed a solution for creating a self-service web portal that will automate and accelerate the process of delivering cloud environments upon request. The solution as a whole is illustrated in the following diagram:
Steps
- Users access the self-service portal, a web app deployed on Azure App Service.
- Users are authenticated using Azure Active Directory using their work account.
- The web app requests a new deployment from the Azure Resource Manager using the chosen template and the Azure .NET SDK.
- Azure Resource Manager deploys the requested environment, which includes virtual machines running Puppet agents.
- The puppet master serves configuration settings to the Puppet agents, which configure the virtual machines and perform necessary software installations.
But Why?
Before we get started, we should quickly discuss the ‘what’s the point’ argument.
Writing infrastructure as code is pretty nice and I enjoy the declarative approach of defining what you want and letting the tooling take care of the how. Using ARM templates (or CloudFormation templates in AWS) allows for a developer to create quick and precise environments every single time.
Below are three main practices that ODIN encourages:
- Self-service environment. The solution as a whole implements the “self-service environment” DevOps practice because it allows users to trigger the deployment of new cloud environments in a fully automated manner with a simple button click.
- Infrastructure as code. The use of Resource Manager templates allows a team to manage “infrastructure as code” a DevOps practice that allows developers to define and configure infrastructure (such as cloud resources) consistently while using software tools such as source control to version, store, and manage these configurations.
- Security through eradication. Over 250,000 new malicious programs are found every day. Antivirus says your systems are fine. Intrusion Prevention Systems say you are safe. You hire a professional to scan your network and he/she concludes that a backdoor was previously installed into your network. You have no idea how many systems have been compromised. Did I mention that it is a Saturday? Infrastructure as code allows for you to easily grab a template from source control, add some new firewall rules and parameters, then invoke it with ODIN. Within minutes you can have your entire infrastructure rebuilt without the infection. With ODIN, you can rebuild all of your servers, mount your original data, then continue with business as usual.
Divide and Conquer
To provide a proof-of-concept implementation of the solution, work was divided into three areas, each focusing on a different part of the solution:
- Implementing the self-service portal code named ODIN.
- Authoring a Resource Manager template to deploy as an example environment.
- Using Puppet to automate post-deployment configuration.
ODIN
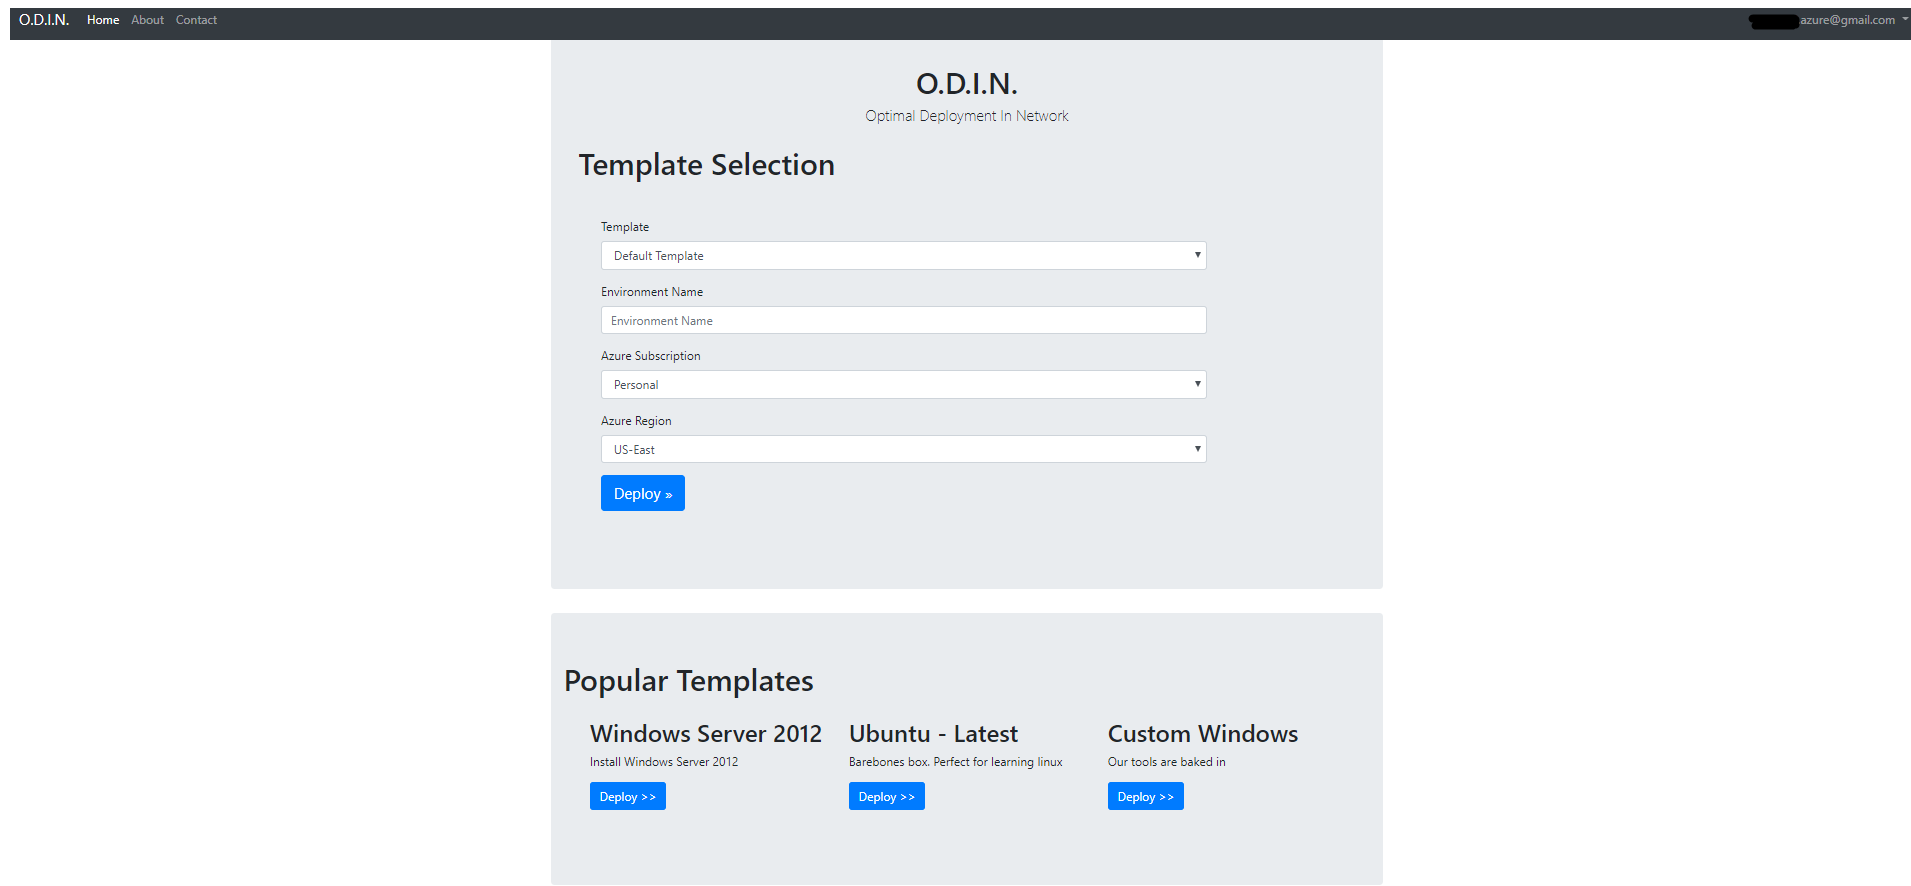
The portal was implemented as an ASP.NET Core web application deployed on an Azure web app. The application was connected to my personal Azure Active Directory for user authentication and I used the Azure .NET SDK to access Azure Resource Manager for deploying environments.
User sign-in with Azure Active Directory
The web app was configured to authenticate, as described in the article ASP.NET web app sign-in and sign-out with Azure AD. This allows users to use their existing work credentials to access the application and the web application to retrieve user profiles easily.
In order to communicate to Azure, you must provide important information identifying your application. I chose to insert my keys into a JSON file. The information that you need are as follows:

Once you have figured out your correct keys, we have to configure authentication for Azure.
[csharp]
public void ConfigureServices(IServiceCollection services)
{
// Adding Auth
services.AddAuthentication(sharedOptions =>
{
sharedOptions.DefaultScheme = CookieAuthenticationDefaults.AuthenticationScheme;
sharedOptions.DefaultChallengeScheme = OpenIdConnectDefaults.AuthenticationScheme;
})
.AddAzureAd(options => Configuration.Bind(“AzureAd”, options))
.AddCookie();
services.AddMvc();
// Adding SignalR
services.AddSignalR(options => {
options.KeepAliveInterval = TimeSpan.FromSeconds(10);
});
services.AddOptions();
// DI
services.Configure<AzureAdOptions>(Configuration.GetSection(“AzureAd”));
services.AddSingleton<AzureAdOptions>();
services.AddSingleton<IHelper, Helper>();
services.AddSingleton<IDeploymentTemplateTask, DeploymentTemplateTask>();
}
[/csharp]
Finally, it is helpful to create an extension method to bind the keys that were located inside of a JSON config to a POCO class. This allows a developer the ability to inject the POCO directly inside of a class constructor via Dependency Injection.
[csharp]
public static class AzureAdAuthenticationBuilderExtensions
{
public static AuthenticationBuilder AddAzureAd(this AuthenticationBuilder builder)
=> builder.AddAzureAd(_ => { });
public static AuthenticationBuilder AddAzureAd(this AuthenticationBuilder builder, Action<AzureAdOptions> configureOptions)
{
builder.Services.Configure(configureOptions);
builder.Services.AddSingleton<IConfigureOptions<OpenIdConnectOptions>, ConfigureAzureOptions>();
builder.AddOpenIdConnect();
return builder;
}
private class ConfigureAzureOptions: IConfigureNamedOptions<OpenIdConnectOptions>
{
private readonly AzureAdOptions _azureOptions;
public ConfigureAzureOptions(IOptions<AzureAdOptions> azureOptions)
{
_azureOptions = azureOptions.Value;
}
public void Configure(string name, OpenIdConnectOptions options)
{
options.ClientId = _azureOptions.ClientId;
options.Authority = $”{_azureOptions.Instance}{_azureOptions.TenantId}”;
options.UseTokenLifetime = true;
options.CallbackPath = _azureOptions.CallbackPath;
options.RequireHttpsMetadata = false;
}
public void Configure(OpenIdConnectOptions options)
{
Configure(Options.DefaultName, options);
}
}
}
[/csharp]
Deploy an ARM Template
The web application needs to send requests to the Azure Resource Manager to deploy new environments. For this purpose, the web application makes use of the Azure .NET SDK to programmatically communicate with the Azure Resource Manager and deploy the requested Resource Manager JSON template. See a step-by-step tutorial on how to deploy a template using .NET. Below is the code that I use to deploy a Virtual Machine to Azure based on a well formatted ARM template.
[csharp]
public async Task<DeploymentExtendedInner> CreateTemplateDeploymentAsync(TokenCredentials credential,
string groupName, string deploymentName, string subscriptionId, string templatePath,
string templateParametersPath)
{
#region Fail Fast
if (string.IsNullOrEmpty(templatePath))
throw new ArgumentNullException(“Template cannot be null!”);
if (string.IsNullOrEmpty(templateParametersPath))
throw new ArgumentNullException(“Parameter template cannot be null!”);
#endregion
var templateFileContents = GetJsonFileContents(templatePath);
var parameterFileContents = GetJsonFileContents(templateParametersPath);
var deployment = new Deployment
{
Properties = new DeploymentPropertiesInner
{
Mode = DeploymentMode.Incremental,
Template = templateFileContents,
Parameters = parameterFileContents[“parameters”].ToObject<JObject>()
}
};
try
{
using (var resourceManagementClient = new ResourceManagementClient(credential))
{
resourceManagementClient.SubscriptionId = subscriptionId;
return await resourceManagementClient.Deployments.CreateOrUpdateAsync(groupName, deploymentName,
deployment.Properties, CancellationToken.None);
}
}
catch (Exception exception)
{
Console.WriteLine(exception.Message);
throw;
}
}
[/csharp]
Infrastructure as code using Resource Manager templates
Azure Resource Manager templates (ARM templates) are the preferred way of automating the deployment of resources to Azure Resource Manager (AzureRM). ARM templates are JavaScript Object Notation (JSON) files. The resources that you want to deploy are declaratively described within JSON. Because they are written in JSON, this allows for versioning of particular templates. This enforces the idea of write once, deploy forever.
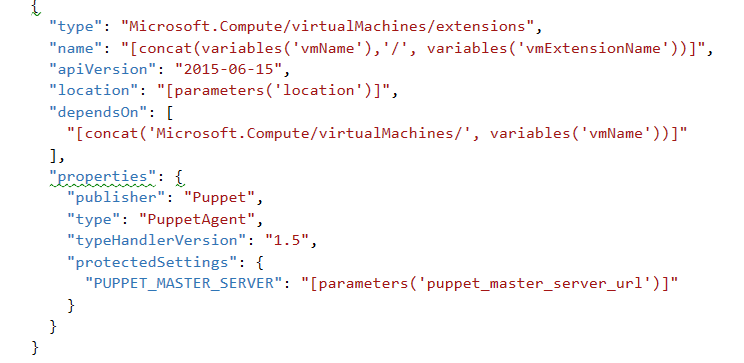
Puppet Enterprise virtual machine extensions
As described earlier, I chose to use Puppet for automating post-deployment virtual machine configuration. This means that Puppet Enterprise agents need to be installed on virtual machines defined in the Resource Manager templates. To make this process truly automatic, the agents need to be installed automatically as soon as the virtual machines are created. This can be achieved by using Azure virtual machine extensions, which allow performing an array of post-deployment operations on Windows or Linux virtual machines.
Puppet
Once virtual machines are deployed for the requested environment, post-deployment virtual machine configuration is handled by Puppet. For more information on Puppet, visit the Puppet official website and the Puppet Enterprise overview.
Installing Puppet
To install Puppet Enterprise, see the official installation guide.
Alternatively, the Azure marketplace offers a preconfigured Puppet Enterprise template that allows users to deploy a Puppet Enterprise environment (including Puppet master server and UI console) within minutes.
Accepting Agents
For security reasons, a Puppet master needs to accept agents that attempt to connect to it. On default, this needs to be done manually using the console. To make the process truly automatic, the Puppet master needed to be configured to automatically accept certificates.
This can be achieved by adding the line autosign = true to the [master]block in the Puppet master configuration file /etc/puppetlabs/puppet/puppet.conf
Note: This was done specifically for this POC. Do not accept agents automatically using this method.
Configure Agents
For the purpose of the POC, I decided to showcase three Puppet post-deployment actions to be executed on the Windows Server 2012 R2 virtual machines:
- Installation of Chocolatey (a Windows package manager).
- Use of Chocolatey to install Firefox.
- Transfer a text file to C:\
Conclusion
This project has been a great opportunity to learn more about Azure and to strengthen DevOps best practices. I had no previous Azure experience before this, so learning how to set up a personal account, resource groups, creating ARM templates, and communicating with Azure Resource Manager via REST was a blast!
At this point, the POC can showcase the following:
- User logs onto the self-service portal using corporate credentials.
- User chooses an environment to be deployed and includes parameters such as region and environment name.
- The web portal uses the associated Resource Manager template to programmatically trigger a cloud environment deployment.
- Virtual machines, deployed in the new environments, run Puppet agents that connect to the Puppet Enterprise master.
- Puppet agents perform installations and configurations on the hosts, preconfigured by the master.
By automating the existing process, ODIN has managed to optimize and accelerate an important part of the dev/test process that use to take days and required manual work.
Looking forward, I have defined the following focus areas for extending the solution:
- Externalizing template parameters to be configured by the user.
- Adding additional templates to be available to users.
- Grabbing templates from BLOB.
- Connecting the implemented solution to the CI/CD process.
- Re-branding the front end using React with Typescript.
- Settings that allow a user to use a hyperlink for a particular template.
- Ability to upload a template directly to the BLOB or a particular storage component.
- ODIN admins can configure ODIN to use Github, Bitbucket, or various storage components for templates.
- Integrating CloudFormation templates for AWS.
- Integrating the ability to deploy Docker images and containers.
In Part II, we will integrate the consumption of ARM templates located in BLOB storage as well as making the application front end more user friendly by using React components. Thanks for reading!
Tools, Software, and More
Below are the tools that were used to create ODIN:
- .NET Core v2.0
- OpenId Connect
- Docker
- ARM Template Base with Parameter Template
- Puppet
- Visual Studio
- Visual Studio Code
- Typescript
- SignalR
- Azure Admin Access
Additional Resources
- Use portal to create Active Directory application and service principal that can access resources
- NET web app sign-in and sign-out with Azure AD
- Export an Azure Resource Manager template from existing resources
- Authoring Azure Resource Manager templates
- Chocolatey – package manager for Windows